Table of Content
Writing the user authentication component
It is just a beginning. Assumning now we have the following feature specs defined in an authenticate.feature file.
 1Feature: Authenticate
 2  Scenario: Before login
 3    Given I am not logged in
 4    When I go to homepage
 5    Then I should see "Sign in"
 6    And I should see "Sign up"
 7
 8  Scenario: Login Page
 9    Given I am not logged in
10    And I am on homepage
11    When I click "Sign in" link
12    Then I should be in the sign in page
13
14  Scenario: Login action
15    Given I have an account
16    And I am not logged in
17    And I am on sign in page
18    When I fill in correct account information
19    And press "Sign in" button
20    Then I should see "Signed in successfully"
21
22  Scenario: Logged in
23    Given I have logged in
24    When I go to homepage
25    Then I should see "Sign out"
26
27  Scenario: Logout action
28    Given I have logged in
29    And I am on homepage
30    When I click "Sign out" link
31    Then I should see "Sign in"
32    And I should see "Signed out successfully"
This feature can be written by you, the developer, or by the project planner who doesn’t know programming at all.
Now when we run the rake cucumber, we get a large block of response, with lots of pending.
We can implement them one by one.
First comes with the basic steps about page nevigation and mouse clicking.
In the authentication,
Note that we use the URL instead of the devise path destroy_user_session_path. It is because during the feature and step writing, we are designing the interface interaction, including the URL. It is not nessesary the authentication must happen with devise gem as long as it works.
And the full authenticate_steps.rb file.
 1email = 'test@example.com'
 2password = 'thisisasecret'
 3
 4Given(/^I am not logged in$/) do
 5  visit '/users/sign_out'
 6end
 7
 8Then(/^I should be in the sign in page$/) do
 9  current_path.should == '/users/sign_in'
10end
11
12Given(/^I have an account$/) do
13  User.new(email:email, password:password).save!
14end
15
16Given(/^I am on sign in page$/) do
17  visit '/users/sign_in'
18end
19
20When(/^I fill in correct account information$/) do
21  fill_in 'Email', with: email
22  fill_in 'Password', with: password
23end
24
25Given(/^I have logged in$/) do
26  User.new(email:email, password:password).save!
27  visit '/users/sign_in'
28  fill_in 'Email', with: email
29  fill_in 'Password', with: password
30  click_button 'Sign in'
31end
Absolutely we will get failed scenarios because we have not written any code on authenticatation. It is time to plug the devise gem in.
In Gemfile
gem 'devise'
And bundle install it.
$ rails generate devise:install
Follow the post-installation instruction to add the notice and alert hook to the application.html.erb file.
Then we create the User model with the devise authentication. Don’t forget to rake db:migrate before proceeding.
1$ rails generate devise User
The setup is ready and we can now re-running the rake cucumber to tackle the failed cases.
The first error we encounter is routing error No route matches [GET] "/users/sign_out". It is because the devise’s sign out route uses DELETE method. We can change it at the devise.rb config file.
Next, the error is expected to find text "Sign in". We can fix that by adding the "Sign in" link to layout file application.html.erb.
1<%= link_to 'Sign in', new_user_session_path %>
And alon the sign up page.
1<%= link_to 'Sign up', new_user_registration_path %>
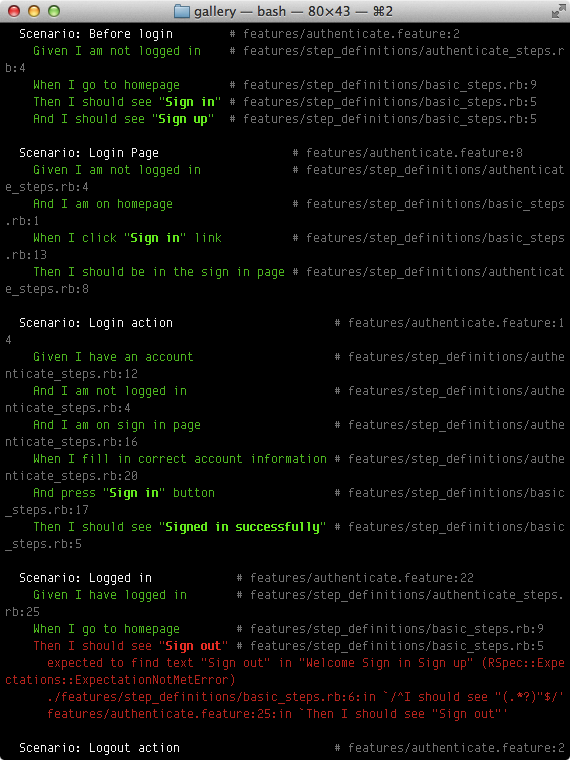
The result of running rake cucumber again:

Thanks to the devise gem have done so much things, we passed several scenarios now. The next error is expected to find text "Sign out".
We can tackle this error by adjusting the authentication links into:
Now we get all passes.
Sometimes the scenarios failed at a confusing points that you don’t expect. How about you can duml the HTML output of that step to deal with failing scenarios? capybara-screenshot gem is the one to use.
Add the capybara-screenshot gem to the :test group
1gem 'capybara-screenshot'
And in the features/support/env.rb file, add the following line:
1require 'capybara-screenshot/cucumber'
Now when fail scenario occurs, a dump of the target HTML will be saved:
1Saved file /Users/makzan/Dropbox/share_to_air_mak/CPTTM/CM436-RoR/repo/lesson7_examples/gallery/tmp/capybara/screenshot_2013-10-17-18-13-24.911.html
The idea here is that you can freely change how the view look and the test cases act as a guard to protect the most basic functionality – user can login and logout.
What’s next? We’re going to take a look at “Writing the photo upload component”.
